Well, I’m still learning myself, but here’s a few tips I usually keep in mind!
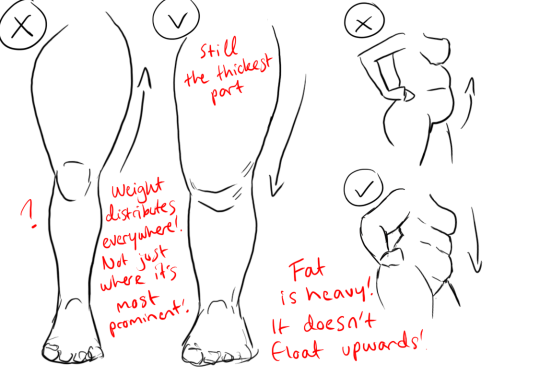
1.) “Fat” is not just a big belly!
Fat distributes everywhere, but not necessarily equally! Like at
any weight, every body is different and has an unique shape! Some keep a
hourglass shape, some become more pear-like, some are shaped like
teardrops or apples… but the basic thing is, fat doesn’t just choose
one place where it WON’T gather. It may not be as visible in some area
compared to another, but in real life, it’s reeeeaaaaalllllyyyy rare to
just find a person whose fat only stores in their bum, thighs and tits,
leaving their waist, arms, neck and etc slim. Keep the body pleasant and
thick all around, not just in the places where the weight-gain is the
most imminent!
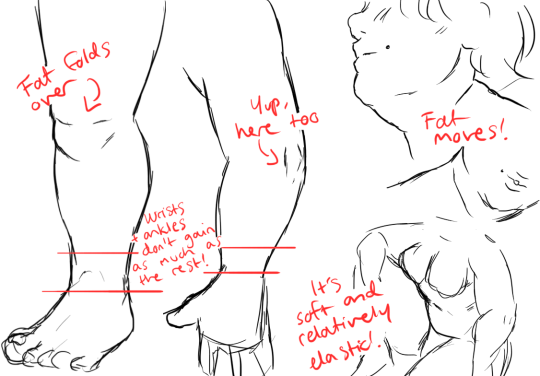
Keep the round shapes in mind!
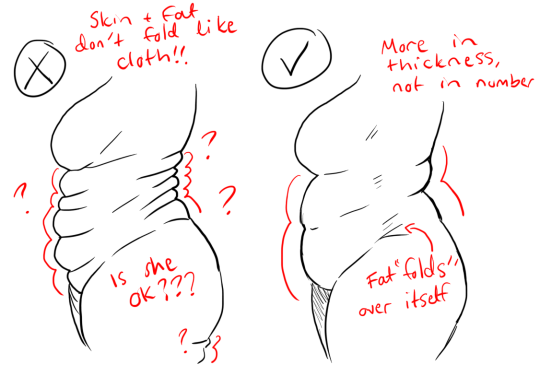
2.) Rolls! Folds! What are they?
What are they? Not something to be afraid of, that’s for sure!
Basically,
don’t hesitate to give your characters fat rolls. Skin folds, stretches
and moves along with the body, and so does the fat under it! However, a
lot of people who draw rolls tend to give the character many super
small ones — this is not how rolls work! Usually, the thicker the
person, the thicker the rolls — they increase in size, not necessarily
in number.
Rolls are the most preminent in places where the body moves the most, AKA the joints. Fat folds over itself and creates creases and ‘rolls’.
3.) HOWEVER….
(No references here, sorry!!!)
When we age, our skin loses its elasticity and it can’t keep the rolls and folds thick and perky. In our youth, our weight can be held up way better than in our elderly days due to the stength and adaptivity of our skin which disappears as we age. Thus, fat tends to droop lower with older people, and the rolls appear thinner. This can also happen if someone who has had a LOT of weight packed up suddenly losing a big chunk of it — the skin can’t adapt and will begin to “droop“ down and lower. Make sure to keep such factors in mind when drawing and planning how the weight of your characters should be carried!
And then, a lil tip that;
4.) Study references and real life!
If you yourself pack some weight or have access to internet, libraries or just life on the street, you will see how bodies at different weights and shapes work and move. Use references, see for yourself — try to find how fat distributes and especially, HOW IT FOLDS! Folds and rolls seem to be one of the biggest problems many have while drawing thicker characters, and that’s ok — we’re taught as a society that fatrolls are inherently bad and disgusting, therefore there are not many situations where we’d find ourselves just… staring and studying how the fat in our bodies works and moves. You’ll learn quickly, though!
I’m still learning myself, but especially since every body is different and the weight we pack acts in unique ways, it can be really challenging to find the ‘absolute’ right way to draw thicker characters. Don’t give up! You’ll get the hang of it eventually!!
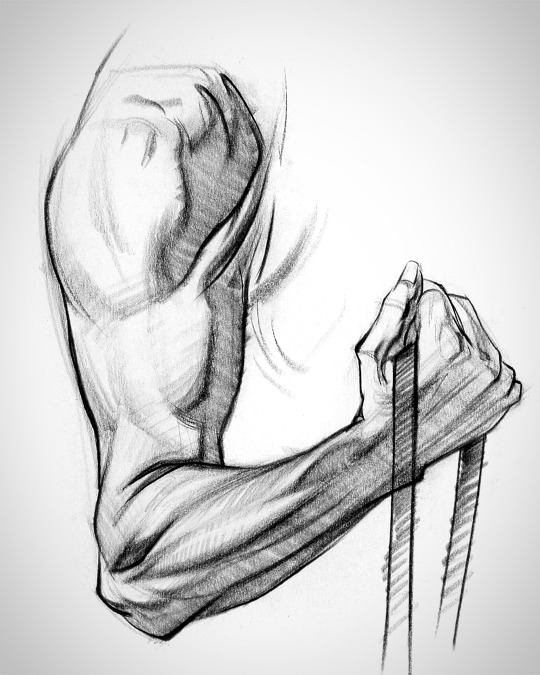
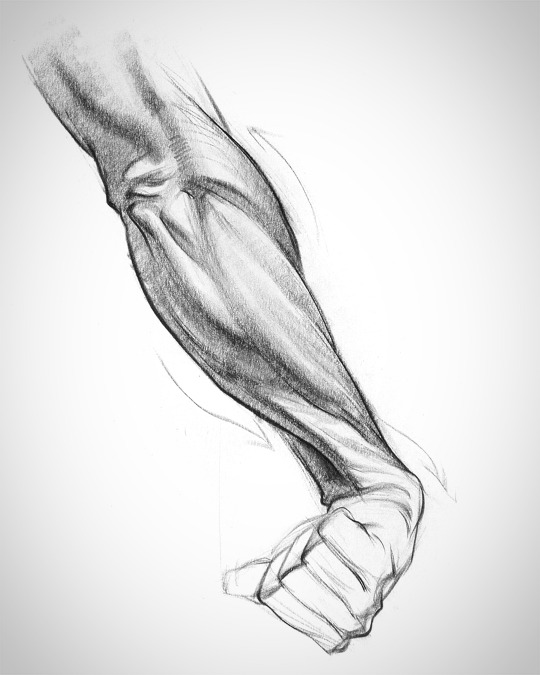
There’s three main groups: the flexors and extensors each take one half of the forearm, and the ridge muscles sit on top like a little tiara. Each group has it’s own unique form. Learning their anatomy will help you design awesomely dynamic arms.
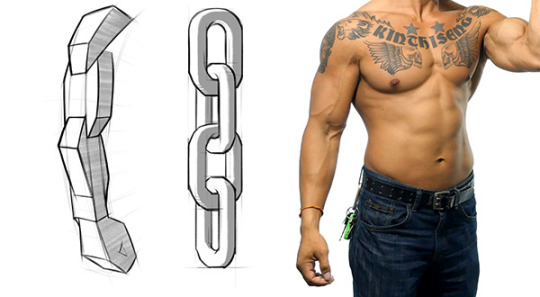
Let’s try to make forearms manageable to draw. This is a body part most artists don’t quite understand. It can be real intimidating if you don’t know the muscles.
The arm has a simple chain design and the forms interlock down the arm.
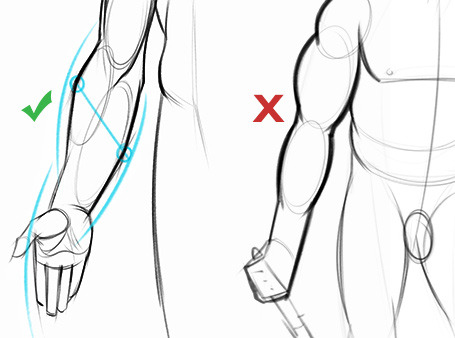
To avoid the snowman effect, use straight, angular lines and look for asymmetries. Compare the apex of both sides of the forearm to understand the curvature better. Notice that the flexors reach lower on the wrist than the extensors and ridge muscles.
Look for this kind of thing when you’re drawing the gesture of the muscle groups. A wave rhythm where the curve on one side leads into the next curve on the other side.
Hi guys. I’m going to piss off a lot of YA writers (and possibly
readers) today, so hang onto your hats.
Mainly, if you’re in love with the idea of a high schooler
with no strategic or combat experience heading up a revolution or war because
they’re “so dedicated and determined,” don’t read this. Please, don’t. You’re
not going to see anything you like. Go ahead and keep enjoying your guilty
pleasure – that’s fine. I’m not going to own up to some of the guilty pleasures
I love in fiction but don’t buy for a second in real life. That’s chill. Go for
it, man.
But there are just things that I – and readers like me – are
tired of seeing. If you’re sick of that trope, then keep reading. If you’re
open to the idea of ditching that trope in your writing, then I really
recommend reading.
This assessment/collection of tips on why teens shouldn’t run
revolutions – and if you’re going to make them, how they CAN do it well – will
include comparisons to history, other fiction (Unplugged), and Black Butler.
Plus swearing and a range of incorrect capitalizations, because it’s fun.
Re: Bird holding: Here’s a volunteer group at the Wild Bird Fund being shown how to hold a pigeon! We always emphasize the importance of keeping your thumbs lightly pressed on the shoulders to help maintain control of the wings without putting too much pressure on the chest.
I hope it’s ok if I add another hold that is used primarily for captive/domestic pigeons called The Fancier’s Hold. It can be used for other birds but in wild birds I’ve only seen it on ones that are exceptionally calm or so sick they aren’t putting up much of a fight. However, most racing pigeons will be accustomed to being held like this and it might help with stress if you find/capture one that’s gotten lost.
Basically it looks like: (This is Loa, my house pigeon)
How to do it, ideally this is good for picking birds up if you’ve thrown a towel or net over them or if they’re in a small cage/enclosure:
Pick which hand you want to hold with.
Have the bird facing you (so if they struggle or need extra support you can rest them against your body and they cannot go anywhere).
You will use your index and middle fingers to gently immobilise the legs and your thumb will come over the bird’s back to control the wings.
The bird’s weight will rest in your palm, your other fingers and the heel of your hand will be used to gently pin the wings to the body
The chest of the bird can either be free or you can rest the bird on your other hand, some birds find this more comforting
Make sure the bird is free to move it’s chest as sternal movements allow the bird to breathe since they don’t have a diaphragm (which is why this hold is great because respiratory restriction is minimised)
For some of the larger birds there are modified versions where both legs are restrained between the index and ring fingers and the middle finger goes between the legs to prevent you jamming the hocks together painfully and to give you better control since you’re technically holding both legs individually rather than both together.
There’s other holds for all sorts of birds so this is mainly for pigeons and pigeon-sized birds.
I pulled some other pictures off google to show the hold to help with visualisation