Yeah. You see those guys? Those skeleton guys up there?
They’re the bones of all the tropes we’re slaughtering in this book.
Are you excited? I’m excited.
What Is It?
It’s literally exactly what it says on the cover.
It’s 10 BS tropes that drive me NUTS, which I am killing with death. And possibly with fire.
But it’s not just whining. This little booklet has actual workarounds and solutions to help guide you away from the worst of it.
How Much Is It?
This little 30-page guide can be had for the low low price of FREE.
FREE. fffffrrrreeeeeeeeeeeee *drools*
When Can I Get My Grubby Little Hands On It?
Well, that depends. If you’re a Patreon Supporter, the link already went up last night.
(For those of you who aren’t, don’t worry. It’s coming soon.)
I’m going to make it publicly available here, too. I’m still ironing out some kinks with the new website, which isn’t 10000% ready for prime-time yet. Since the eBook is on the website, it’s still a dicey proposition.
Wow. Guess the little jerk just doesn’t want to be seen yet.
But I’ll tell you what….
Contest: Medical Writing Prompt #1
I will personally email a copy of this eBook to the writers of the 3 best stories based off of the following prompt:
“Doctor Henshaw, I would trust you with my life. You know that. But I really, really don’t trust you with this…”
How This Is Going to Work
1) Read the prompt.
2) Write a thing.
3) Reblog this post here, on Tumblr, with your story and the tag #AuntScriptysPromptChallenge . Please try to keep them short. Please?
4) You have 24 hours from now (so until 10AM Wednesday EST).
5) I will pick the 3 winners by 1:30PM on Wednesday (EST). They’ll get notified by direct message, and their email address requested. I’ll email them from there.
So Get Typing!
Good luck. And may the gods be ever in your favor… and you ever escape their wrath.
On the broader topic of Copics, I HIGHLY recommend following YouTube guru and licensed Copic Illustrator / Teacher Sandy Allnock on YouTube. She’s wonderful and has many videos across the board about copics (and water color and some other products she likes to use for her card making). She has a blog too, that has lots of useful information as well.
When I started out, I found this chart of hers very helpful for a good starter set of general colours. I personally swapped out some of the brighter groups for darker ones, because I almost only draw ‘dark’ material – from Wh40k stuff to Lovecraft, I just don’t use much truly bright shades.
On the specific topic of skincolours, it’s sort of trial and error. I am always experimenting with combinations for varied, diverse and realistic skintones. Trying out the combinations I see others, including Sandy use, etc. Here are some pictures of my own favourite skin ‘records’ (if you use copics, I highly recommend keeping track of your favourite colour combinations because you WILL forget). I use business card sized printed thingies and colour them in to try out combinations as well as record favourites. These are all taken under my daylight lamp, so they should be reasonably close to their real appearance, depending on your monitor settings.
I use the right one a lot for EC and Vallerie, for example. The left one is a favourite among various artists I know, but I don’t like it. Too orangy/barbie coloured.
The one skintone to rule them all, this is the combination I use for the Emperor although I use the shade a little heavier than is shown here.
One of my first attempts at medium dark skin, and still one of the ones I like best.
Plenty nice light combinations out there (*loosk at the camera*) I very much like the middle one for the regular “middle aged rugged white dude” look, it has that sort of “tanned” quality to it. The right one I am really fond of as well, its light but has a very beautiful red cast. Depending on how heavy you use the shade, it could be very suited to mesoamerican characters.
These are some of my older attempts, they look flatter than the others because I had not yet discovered the wonders of counter shading with purples. Heh. But still, they are quite servicable if you don’t own literally every marker like yours truly who cannot say no to markers. Ever.
Another recent set of favourites, that are the end result of a long and stressful path trying to render myself a red-cast skintone I liked for Magnus (left) and a more brown one for generic Thousand Sons (right).
So uh. Yea? These are some of my favourites, and the best way to get started is probably trying to see what markers they have in common across ones that you like, and get those, and try for yourself? These are mostly E10, E20 and E30 range markers, with some select higher Es and BVs for the shading. A good BV to get is the BV20s group. They work for most skintones. Alternatively, you can use warm greys, but I find it desaturates the skin / makes it look dead.
Hey there, true believers, today’s topic is Blood effects and how to make ‘em work for you.
Blood is a substance like few others. It has several unique visual properties, depending on the state you come across it. This effect can prove very difficult to capture in miniature. If you can nail it, you can add a ton of visceral carnality to a piece and really evoke an emotional response using subtle (and less than subtle) visual cues. There are a couple of tailor made products for the effect, Citadel’s “Blood for the Blood God” technical paint, and Tamiya’s “Clear Red X27″, but I’ve found you can get a higher degree of verisimilitude mixing your own gore.
If used appropriately, You can use it to create motion/action in your pieces, whether through the direction of a splatter or even active bleeding.
SPLATTER EXAMPLE
BLEEDING EXAMPLE
Being able to capture these moments successfully can lend a ton of dynamism to a medium that is often comparatively static. Combine that with the emotional response that blood evokes in people (up to the extreme of some people feeling unwell at the sight of it), and you can see how carnage can be a powerful tool to employ as an artist – Provided you have mastered the effect.
In the same way a well done blood effect can tie a bow on a scene, a poorly executed one has a decidedly more distracting and comedic effect
RED FOR THE RED GOD
Enough Jibber Jabber, lets talk blood theory!
THEORY
Blood has several different distinct visual states, depending on its age, viscosity, depth, source, etc. For simplicity sake, and since we’re limiting the application to miniatures, we’re only going to discuss three types of blood, as these will be the ones most often visually depicted in miniature. This is also the reason why painting a bit of red on your weapon never really looks right. The stuff has depth, yo.
These are new blood, old blood, and dried blood.
The whole point of blood is to carry oxygen around to the cells of the body it resides in. Even the blood within your body has different colors, depending on how recently it was oxygenated. The difference can be quite dramatic, especially taking into account how much we need to exaggerate color contrasts in miniature for the effects to play correctly on the eye.
NEW BLOOD VS OLD BLOOD
Both of the examples in the image above are fresh and from the same body. The one on the left is freshly oxygenated arterial blood, and the one on the right is less oxygenated venous blood.
Both are still fresh, in that they have the same viscosity, but there is already a pronounced color difference in between the two. For the sake of miniature, we’ll generally be trying to capture the gem like quality of venous blood, in our pieces, as it has a greater visual interest in it’s depth of contrast, and will play more like blood at the scale.
Another thing you’ll need to take into account, is the characteristics of dried blood.
BLOOD MEAL
Blood has a very high iron content, and iron oxidizes (rusts) when it is exposed to oxygen. The image above is literally freeze dried blood. Notice how brown/violet it becomes when drying. If you’re creating a scene with old blood smears, or trying to tell a story where something violent has been happening for a long time in one spot, it is important to incorporate these colors (in a matte finish) along with the fresher, ‘wet’ blood effects.
LIQUID DYNAMICS
Blood is clearly a liquid, though to see the way some people apply it to miniatures, you wouldn’t know. I’m a big fan of the “Rule of Cool” with regards to art.
If it looks awesome, I don’t care if the kid couldn’t life a giant sword, the mech would snap in half at the waist or a dude would melt from wearing armor made of lava.
The real problem is that in order for blood to look awesome, it has to follow the physical properties that govern stuff in the real world.
It’s important to be aware of the sense of motion that you’re attempting to create with your splatters. Look at how both the angle changes the shape/direction of the splatters, and what the depth of the blood does to it’s opacity and overall color. See how it darkens substantially as it lies thicker against the white backdrop. These are all factors to be mindful of, when generating the blueprint of your effect in the mind’s eye, prior to execution.
COLOR THEORY
The painting of blood, without the use of a gloss medium, requires usage of the range colors above. Often, the mid tone red is selected, and then taken down the spectrum utilizing purple, blue or black, until it reaches the desired deep tone. You can accomplish this using any particular brand of paint you find most desirable…
We’re going to cheat though.
I’m going to cut through the color theory lessons, and show you how to get a convincing depth of blood using low opacity paints and gloss medium.
WARCOLOURS WAY
Warcolours are fantastic for this application, as they’ve a lower opacity than other paints, allowing you to layer them on top of each other without entirely masking off the surface layers below them. This special translucency allows you to build up depth, without worrying about your blood effects become opaque and homogeneous blocks of red.
The steps are exceedingly simple.
1. Mix Red 5 with gloss medium (and a tip of purple/black, if you’re feeling rowdy). 2. Dip a course bristled brush in the pool of paint (I use an old toothbrush) 3. Drag your thump across the bristles, flicking the paint in the direction you want it to splatter. 4. Mix Red 4 with gloss medium (and a tip of Red 5, if you’re feeling rowdy) 5. Repeat Steps 2 and 3.
EXAMPLE
This should get you well on your way to conquering your own blood effects. I’ll do another tutorial on pouring liquids here in the near future, if that particular effect catches your fancy.
“Most of the time when we are painting, we get so overwhelmed with all the info, which is why practicing the lighting fundamentals beforehand will be beneficial for future work. This will be a pretty lengthy article, but it is pretty comprehensive in terms of necessary fundamentals.
Fundamental #1: Importance of the Plane
When painting and using light, you need to switch from the form build-up approach to thinking about the right plane structure to make the right lighting decisions.
If you can simplify the elements into the proper planes you will understand the structure better and you will be able to assign the right values (when lighting).
Fundamental #2: Light Properties
There are some consideration to make when thinking about lighting. I will try my best to explain some of properties and explain how the lights affect the values and colors of a scene.
Light-Shadow Ratio: The light-shadow ratio determines how much of a contrast there is between light and shadow. A higher contrast is created due to sunlight, and a lower contrast due to overcast weather for example. This is caused by different intensities in light.
Value Keys: Value keying is mainly a design technique used to adjust the value scale while maintaining the light-shadow ratio. Depending on the light situation we have a specific value key in the scene.
Value Compression: Value compression is needed, because we as painters can´t get the full range of light into our paintings. We need to decide, if we want to expose for the light side or shadow side and sacrifice the values on the other side
Light Color: The first thing to understand about light is that it constantly changes it´s wavelengths, therefore changing it´s color. To simplify the process just identify the light as a warm or cold light.
Shading Components
Fundamental #3: Light Set-up
Now that we know how values and colors and affected by light, let´s look at how to set up lighting situations. These lighting situations are always used, and can be divided into natural and artificial light:
Light Types: There are only 3 basic light types you need to know to light your scene. Key Light, Fill Light and Rim Light.
Light Sources: There are only so many light sources that exist. Knowing about them will help you identifying them in any given reference and use them creatively.
Global Illumination: The characteristics of global illumination is the use of bounced/reflected light. It is used to calculate where reflected light is coming from, so we know which planes receive what light in any given scene. You need to treat it as a diffuse light source. It is most effective when there are a lot of shadows.
Fundamental #4: Material Behaviour
Many Material renders disregard the properties of Light. The reason we have learned about light in the first place is to convey materials in different lighting conditions and make them congruent to the scene. Let´s look at the materials and how light interacts with different surfaces.
Learn how to think about shapes, value, color and edges and understand it to apply the knowledge of physics to adjust your values and colors. A proper artist knows both the mechanics of painting and of physics.”
For full explanations complete with image examples, go to the article.
Wonderful examples. The great thing about this is that these show some basic mechanics that you’d use with a sword but in a way that you can practice without any equipment, or with only resistance bands as is the case with the last two exercises shown. Which is great for established clubs but also small groups or those simply starting out without much equipment.
And the last one is great for some solo work at home if you have the proper rubber bands.
Check dis out. Good stuff, good video, loved the explanation. Open the link to the article in Google Chrome and run the translation on it, then read it fuzzing your mind kind of like unfocusing your eyes and let the concepts seep in, since the translation won’t quite get there, but you can if you’re a practitioner and feel your way into what they’re saying (plus this magnificent video).
And remember, if you see folks with tattoos, car decals, or flags of these symbols or any other recognized white supremacist/neo-nazi/fascist symbols, GET PHOTOS OF THAT SHIT. I really cannot stress this enough. Make their faces and vehicles known.
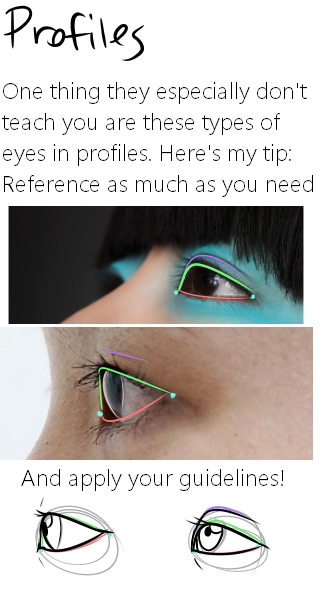
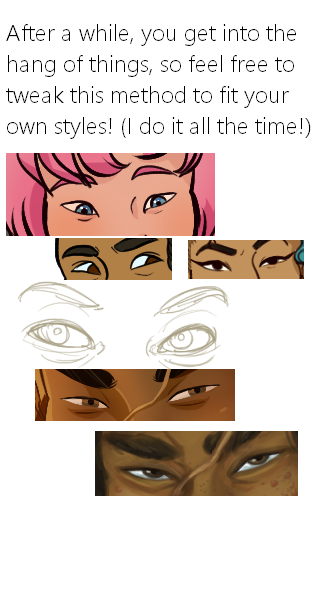
Here it is, my long winded tutorial, complete with some step by step action. I see a lot of people talk about wanting to diversify their artwork but not knowing how. This is my help to you. You really should take the time to invest in learning diverse eye shapes as diverse artwork always makes you a better artist. And frankly I’m really tired of drawing tutorials that talk up character diversity but only have the stereotypical “one Asian eye”.
I did some step by steps for those three diagrams, but I actually got them from this blog which has 14 of those examples! (Bonus: it’s a makeup blog so if you need help with that or want some idea of how to shade these eyes, there ya go)
Here’s a general rule: People in the past were ignorant about a lot of things, but they weren’t stupid. If they used something, chances are they had a good reason. There are exceptions, but plate armor is not one of them.
Long Answer:
For a type of armor, no matter what it is, to be considered effective, it has to meet three criteria.
The three criteria are: Economic Efficiency, Protectiveness, and Mobility.
1. Is it Economically Efficient?
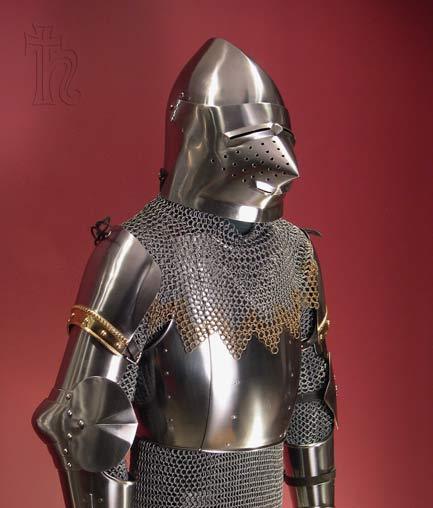
Because of the nature of society in the Middle Ages, what with equipment being largely bring-it-yourself when it came to anybody besides arrowfodder infantry who’d been given one week of training, economic efficiency was a problem for the first couple of decades after plate armor was introduced in France in the 1360s. It wasn’t easy to make, and there wasn’t really a ‘science’ to it yet, so only the wealthiest of French soldiers, meaning knights and above, had it; unless of course somebody stole it off a dead French noble. The Hundred Years War was in full swing at the time, and the French were losing badly to the English and their powerful longbows, so there were plenty of dead French nobles and knights to go around. That plate armor was not very economically efficient for you unless you were a rich man, though, it also was not exactly what we would call “full” plate armor.
Above: Early plate armor, like that used by knights and above during the later 1300s and early 1400s.
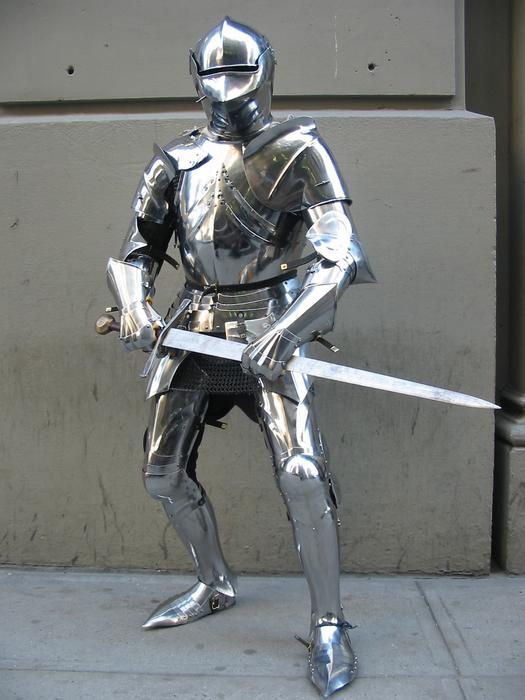
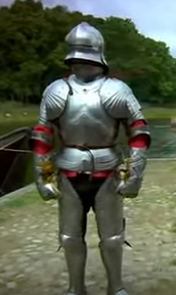
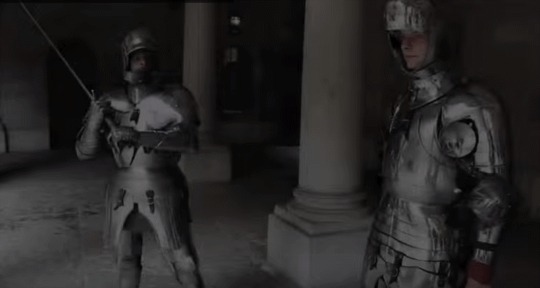
Above: Two examples of what most people mean when they say “full” plate armor, which would have been seen in the mid to late 1400s and early 1500s.
Disclaimer: These are just examples. No two suits of armor were the same because they weren’t mass-produced, and there was not really a year when everybody decided to all switch to the next evolution of plate armor. In fact it would not be improbably to see all three of these suits on the same battlefield, as expensive armor was often passed down from father to son and used for many decades.
Just like any new technology, however, as production methods improved, the product got cheaper.
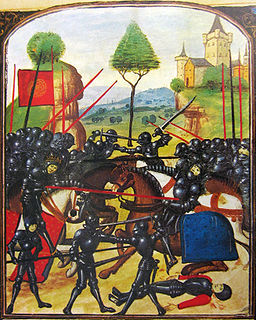
Above: The Battle of Barnet, 1471, in which everybody had plate armor because it’s affordable by then.
So if we’re talking about the mid to late 1400s, which is when our modern image of the “knight in shining armor” sort of comes from, then yes, “full” plate armor is economically efficient. It still wasn’t cheap, but neither are modern day cars, and yet they’re everywhere. Also similar to cars, plate armor is durable enough to be passed down in families for generations, and after the Hundred Years War ended in 1453, there was a lot of used military equipment on sale for cheap.
2. Is it Protective?
This is a hard question to answer, particularly because no armor is perfect, and as soon as a new, seemingly ‘perfect’ type of armor appears, weapons and techniques adapt to kill the wearer anyway, and the other way around. Early plate armor was invented as a response to the extreme armor-piercing ability of the English longbow, the armor-piercing ability of a new kind of crossbow, and advancements in arrowhead technology.
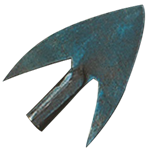
Above: The old kind of arrowhead, ineffective against most armor.
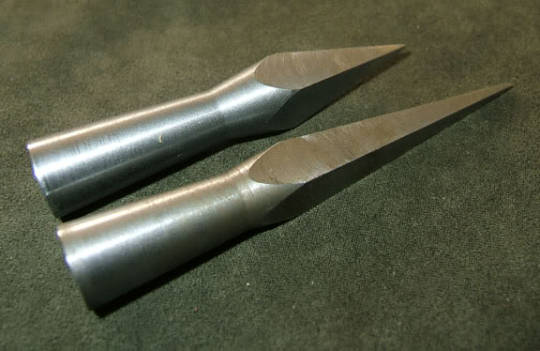
Above: The new kind of arrowhead, very effective at piercing chainmaille and able to pierce plate armor if launched with enough power.
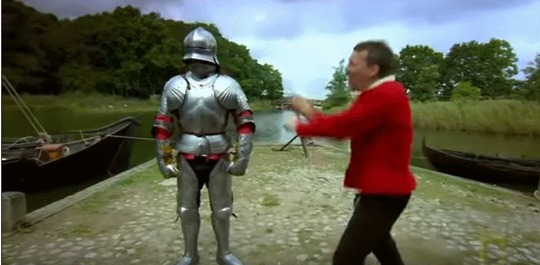
Above: An arrow shot from a “short” bow with the armor-piercing tip(I think it’s called a bodkin tip) piercing a shirt of chainmaille. However, the target likely would have survived since soldiers wore protective layers of padding underneath their armor, so if the arrow penetrated skin at all, it wasn’t deep. That’s Terry Jones in the background.
Above: A crossbow bolt with the armor piercing tip penetrating deep through the same shirt of chainmaille. The target would likely not survive.
Above: A crossbow bolt from the same crossbow glancing off a breastplate, demonstrating that it was in fact an improvement over wearing just chainmaille.
Unfortunately it didn’t help at all against the powerful English longbows at close range, but credit to the French for trying. It did at least help against weaker bows.
Now for melee weapons.
It didn’t take long for weapons to evolve to fight this new armor, but rarely was it by way of piercing through it. It was really more so that the same weapons were now being used in new ways to get around the armor.
Above: It’s a popular myth that Medieval swords were dull, but they still couldn’t cut through plate armor, nor could they thrust through it. Your weapon would break before the armor would. Most straight swords could, however, thrust through chainmaille and anything weaker.
There were three general answers to this problem:
1. Be more precise, and thrust through the weak points.
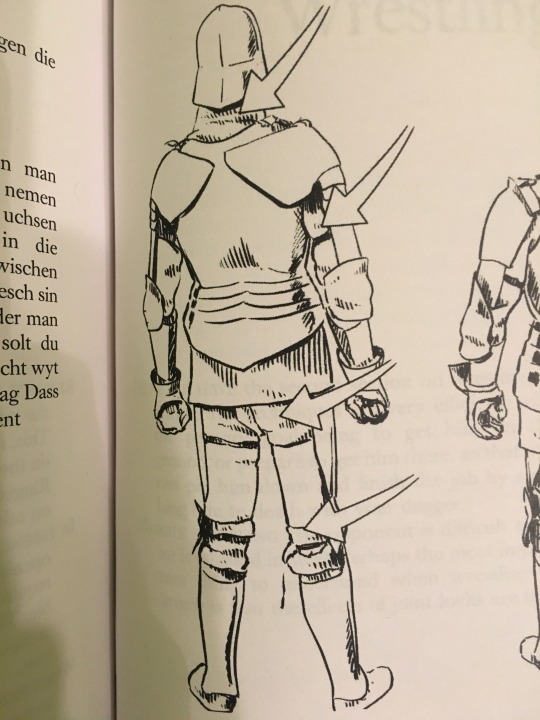
Above: The weak points of a suit of armor. Most of these points would have been covered by chainmaille, leather, thick cloth, or all three, but a sword can thrust through all three so it doesn’t matter.
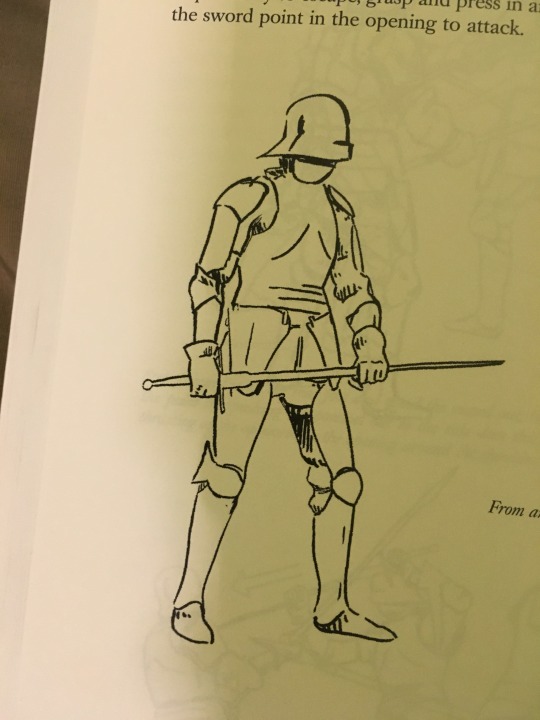
To achieve the kind of thrusting accuracy needed to penetrate these small gaps, knights would often grip the blade of their sword with one hand and keep the other hand on the grip. This technique was called “half-swording”, and you could lose a finger if you don’t do it right, so don’t try it at home unless you have a thick leather glove to protect you, as most knights did, but it can also be done bare-handed.
Above: Examples of half-swording.
2.Just hit the armor so fucking hard that the force carries through and potentially breaks bones underneath.
Specialty weapons were made for this, but we’ll get to them in a minute. For now I’m still focusing on swords because I like how versatile the European longsword is.
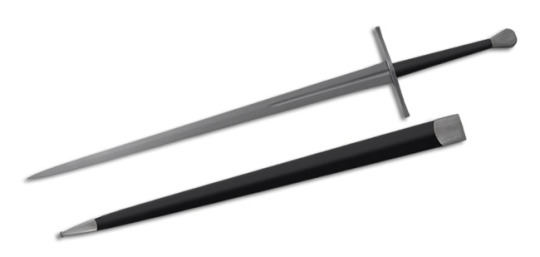
Above: A longsword. They’re made for two-handed use, but they’re light enough to be used effectively in one hand if you’d like to have a shield or your other arm has been injured. Longswords are typically about 75% of the height of their wielders.
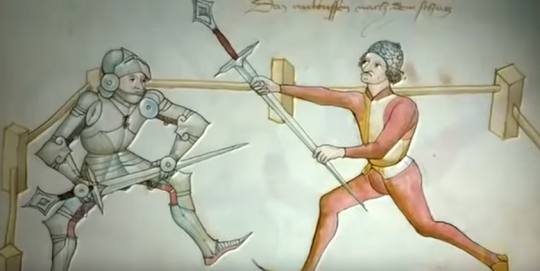
Assuming you’re holding the sword pointing towards the sky, the part just above the grip is called the crossguard, and the part just below the grip is called the pommel. If you hold the sword upside-down by the blade, using the same careful gripping techniques as with half-swording, you can strike with either the crossguard or the pommel, effectively turning the sword into a warhammer. This technique was called the Murder Stroke, and direct hits could easily dent plate armor, and leave the man inside bruised, concussed, or with a broken bone.
Above: The Murder Stroke as seen in a Medieval swordfighting manual.
Regular maces, hammers, and other blunt weapons were equally effective if you could get a hard enough hit in without leaving yourself open, but they all suffered from part of the plate armor’s intelligent design. Nearly every part of it was smooth and/or rounded, meaning that it’s very easy for blows to ‘slide’ off, which wastes a lot of their power. This makes it very hard to get a ‘direct’ hit.
Here come the specialized weapons to save the day.
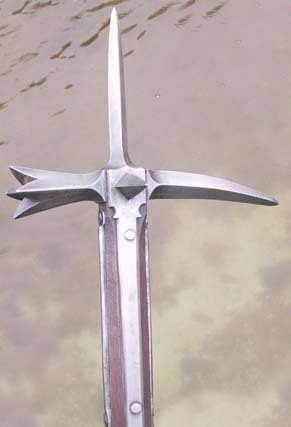
Above: A lucerne, or claw hammer. It’s just one of the specialized weapons, but it encompasses all their shared traits so I’m going to only list it.
These could be one-handed, two-handed, or long polearms, but the general idea was the same. Either crack bones beneath armor with the left part, or penetrate plate armor with the right part. The left part has four ‘prongs’ so that it can ‘grip’ smooth plate armor and keep its force when it hits without glancing off. On the right side it as a super sturdy ‘pick’, which is about the only thing that can penetrate the plate armor itself. On top it has a sharp tip that’s useful for fighting more lightly armored opponents.
3. Force them to the ground and stab them through the visor with a dagger.
This one is pretty self-explanatory. Many conflicts between two armored knights would turn into a wrestling match. Whoever could get the other on the ground had a huge advantage, and could finish his opponent, or force him to surrender, with a dagger.
By now you might be thinking “Dang, full plate armor has a lot of weaknesses, so how can it be called good armor?”
The answer is because, like all armor is supposed to do, it minimizes your target area. If armor is such that your enemy either needs to risk cutting their fingers to target extremely small weak points, bring a specialized weapons designed specifically for your armor, or wrestle you to the ground to defeat you, that’s some damn good armor. So yes, it will protect you pretty well.
Above: The red areas represent the weak points of a man not wearing armor.
Also, before I move on to Mobility, I’m going to talk briefly about a pet-peeve of mine: Boob-plates.
If you’re writing a fantasy book, movie, or video game, and you want it to be realistically themed, don’t give the women boob-shaped armor. It wasn’t done historically even in the few cases when women wore plate armor, and that’s because it isn’t as protective as a smooth, rounded breastplate like you see men wearing. A hit with any weapon between the two ‘boobs’ will hit with its full force rather than glancing off, and that’ll hurt. If you’re not going for a realistic feel, then do whatever you want. Just my advice.
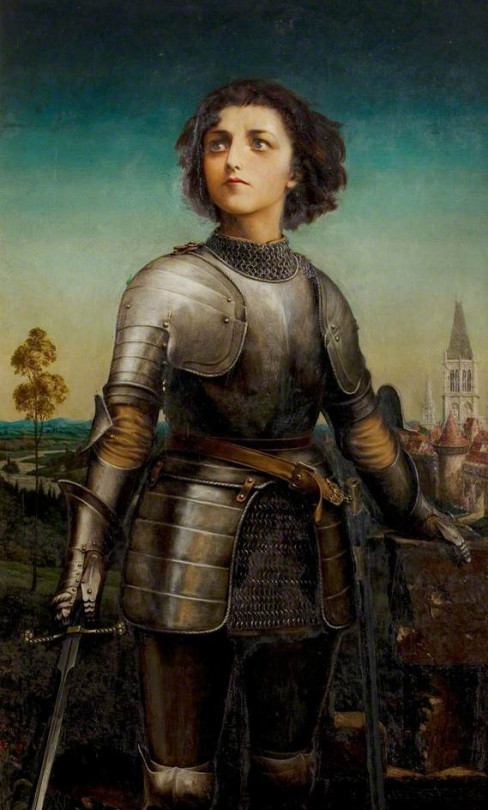
Above: Joan of Arc, wearing properly protective armor.
An exception to this is in ancient times. Female gladiators sometimes wore boob-shaped armor because that was for entertainment and nobody cared if they lived or died. Same with male gladiators. There was also armor shaped like male chests in ancient times, but because men are more flat-chested than women, this caused less of a problem. Smooth, rounded breastplates are still superior, though.
3. Does it allow the wearer to keep his or her freedom of movement?
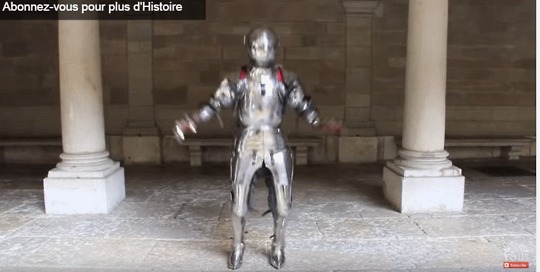
Okay, I’ve been writing this for like four hours, so thankfully this is the simplest question to answer. There’s a modern myth that plate armor weighed like 700 lbs, and that knights could barely move in it at all, but that isn’t true. On a suit of plate armor from the mid to late 1400s or early 1500s, all the joints are hinged in such a way that they don’t impede your movement very much at all.
The whole suit, including every individual plate, the chainmaille underneath the plates, the thick cloth or leather underneath the chainmaille, and your clothes and underwear all together usually weighed about 45-55 lbs, and because the weight was distributed evenly across your whole body, you’d hardly feel the weight at all. Much heavier suits of armor that did effectively ‘lock’ the wearer in place did exist, but they never saw battlefield use. Instead, they were for showing off at parades and for jousting. Jousting armor was always heavier, thicker, and more stiffly jointed than battlefield armor because the knight only needed to move certain parts of his body, plus being thrown off a horse by a lance–even a wooden one that’s not meant to kill–has a very, very high risk of injury.
Here’s a bunch of .gifs of a guy demonstrating that you can move pretty freely in plate armor.
Above: Can you move in it? Yes.
Here are links to the videos that I made these .gifs from:
You’re written a very good article. I believe it deserves a full-length reply. As much as I enjoyed it, there are just a few corrections I’d like to make, and more than a couple clarifications.
First off, just to get it out of the way, I’ve never actually found any account of “arrowfodder infantry” being used historically by any medieval army in Europe. Generally speaking, you would want all your soldiers to be skilled, trained and properly equipped. No matter how much money you had, cost-effectiveness was always something to strive for, and having thousands of useless soldiers who can do nothing but take arrows and die is simply not worth it, especially since they will also be eating your food while they’re still alive. If you wanted to protect your army from enemy archers, you used armor, shields, fortifications and the terrain itself.
Now, about the introduction of plate armor. If we’re talking about what most people think when they hear the term, then yes, that shows up on the second half of the 14th century. Your first picture is a good example of this (that being said, that mail mantle is a much later piece, used here to imitate the mail aventail that would hang from the edges of the helmet). However, solid metal plates have been used as armor for hundreds of years before. Even if we ignore the entire Bronze Age, the Roman Empire and the concept of helmets, we still have to look back at least as far as the 13th century. Schinbalds were curved metal plates strapped on the lower legs to protect the shins. Poleyns were introduced shortly after to protect the knees.
Around the middle of that century, the coat of plates appeared. It was the first step in what could be considered plate armor. It consisted of slightly curved overlapping plates riveted to the inside of a leather or fabric garment shaped like a surcoat. The plates themselves mainly covered the torso and sides, and perhaps some of the back. Below is a drawing of a Teutonic Knight wearing armor of this type, from Osprey Publishing.
Later the structural garment would become shorter and in some cases include decorations of many kinds.
The coat of plates developed in two directions. In one case, the plates got progressively larger, eventually evolving into the globular breastplate we’re all familiar with. Below is a reproduction of a transitional model, somewhere between a mid-14th century coat of plates and an early breastplate. It was beautifully crafted by Piotr Feret.
The chains in models like this served to secure the sword, dagger, great helm and any other object the wearer wouldn’t want to drop and lose. Below we can see the plates before they were finished and riveted to the fabric facing.
Here we can clearly see the similarities between this type of armor and a breastplate. The large plate meant to cover the chest already has the beginnings of that characteristic globular shape meant to deflect blows. Of course, early versions of the globular breastplate were also covered in fabric or leather, which also served to attach it to the fauld or laminated skirt of plates that hanged from it. Below is a set of armor by renowned blacksmith Jeff Wasson featuring one of these pieces, based on historical examples from around the year 1380.
At this point it’s worth noting that breastplates, specifically the solid globular piece, only cover the area of the torso demarcated by the ribs. This is so that the wearer doesn’t lose any flexibility on their waist. The hips and abdomen were protected by the much more flexible fauld.
On the other side of the spectrum we have the coats of plates which eventually evolved into the bringandine. This was a set of much smaller overlapping plates attached to the inside of a vest-shaped garment, usually open at the front, narrower at the waist for purposes of mobility and weight distribution. Below is a model by Armour Services Historical.
This example has a wool facing and is decorated with brass rivets and a Cross of Saint George, characteristic of English soldiers who served in France. Below is a picture of the inside of a similar piece by the same maker, showing the multitude of plates.
The brigandine remained extremely popular all through the 15th century and even well into the sixteenth century, though of course styles changed with time. There even was a variant of it during the Renaissance called a jack of plates, in which the plates were sewn to the inside of a garment which was more similar to civilian clothing, though still unmistakably armor. These could be worn by virtually any kind of soldier, from infantry archers to mounted men-at-arms. They were considerably more comfortable than solid breastplates, and provided a similar level of protection. Solid breastplates did have one considerable advantage, their potential for heat-treating, which I will explain further on.
You say only the wealthiest and most French of individuals could afford “full plate” armor. I’m going to have to disagree with that. While it is true that the French were famous for being able to field large numbers of heavy cavalry and infantry, during most of the Hundred Years War their suits of armor were far from complete. They were very likely to trade the protection of some of the less essential elements of armor in exchange for comfort and mobility. For example, I can tell that the first picture you posted is most likely based on a French suit of armor because of the lack of fauld on that breastplate. On the other hand, English armor of the same period, particularly the early 15th century, was extremely protective, going as far as to cover even the inside of the upper arms. Below is a picture of such a suit of armor, from Osprey Publishing.
Of course, such a suit of armor would be extremely expensive, but this didn’t mean less wealthy soldiers had to rely solely on mail to protect themselves. Bringandines were relatively cheap, for example, and you could simply buy the elements of plate armor you considered more essential, perhaps even resorting to pieces of lesser quality to reduce the cost. Even in the late 15th century, when plate armor became more common, most soldiers were not wearing the full harness. Below is a harness from Best Armour, which could have been used by an infantryman in the middle of the 15th century.
Note how only the torso, head, shoulders, hips and upper arms are protected. The pieces hanging from the fauld, by the way, are called tassets, a common element of plate armor from the 15th century onward. The armor covering the face is called a bevor, attached to the gorget which covers the throat. It could be hinged down to allow easier vision and ventilation. Under the armor a soldier would of course also wear a padded jack and perhaps a pair of sleeves and a skirt of mail.
Also, while in theory you could take any kind of equipment from a fallen enemy or inherit it from a relative, when it comes to solid body defenses you’d ideally want to have them made specifically for you. This would absolutely ensure that it fits you properly, which is vital for having both protection and mobility.
Now, regarding how effective armor is and how it can be defeated. I’m not sure exactly why you think plate armor was created specifically to defeat the English longbow, or that there was such as thing as a new armor-piercing crossbow. Armor in general served and was constantly developed to protect against weapons of any kind, and the breastplate wasn’t any different. The English longbow was a very powerful and effective weapon, but it wasn’t some sort of alien and terrifying artifact for the people of continental Europe. Longbowmen were used as mercenaries by all nations in a multitude of conflicts.
Crossbows were also very common, and in fact ancient. Military crossbows may even predate military bows. If you’re referring to crossbows with steel prods, you have to keep in mind that crossbows in general were never a lot more powerful than bows. For example, a 350 pound crossbow would be roughly as powerful as an 80 pound longbow, which was the lower end of the military longbow power spectrum. This is because the draw length of a bow is much longer than that of a crossbow. Take diminishing returns into account and the most powerful crossbows wouldn’t really have been a lot more powerful than the most powerful longbows. The one huge advantage they did have, however, was that they were a lot easier to aim. You can wind a crossbow and have it ready to shoot for hours. You could position yourself behind a fortification or a large shield and patiently wait for your target to come into range, aim carefully, and shoot accurately. When you draw a longbow, you really only have a couple of seconds to aim, before you get exhausted from holding that string at full draw and have to release it. Expert weapon craftsman Leo Todeschini can probably explain it better. Below is a crossbow that wouldn’t be out of place in the late 15th century, by Leo Todeschini.
This decorated weapon would most likely be used for hunting, but a more simple version would be an excellent weapon of war. It uses a cranequin as a winding mechanism, and has 450 pounds of power in that steel bow.
Regarding arrowheads, you can’t really talk of old obsolete arrowheads and new revolutionary models. All of those existed roughly at the same time, and served different purposes. The long bodkin in fact can be traced all the way back to the Viking era, or perhaps even earlier. The broad cutting arrowheads with large barbs were mostly used for hunting, though of course they could be used very effectively against unarmored humans. The bodkin had an easier time penetrating mail, since its narrow profile could get between the links with much less resistance, though it would still have to penetrate the padded armor that was commonly worn underneath. You could also find less specialized arrowheads with narrow heads and small barbs, a compromise of the two other models. And of course there were numerous other types of arrowheads which I won’t go into here.
Now, how do arrows fare against steel breastplates? Well, a standard broad hunting arrowhead won’t do any good. A bodkin won’t be very effective either, the long point will bend before it penetrates. In any case, anything but an almost perpendicular hit would simply glance off the rounded surface, which is exactly the purpose of that shape. There was a type of heavy arrowhead, with a squared profile and a heavy body. It’s very commonly seen on crossbow bolts. Leo Todeschini has referred to it as a quarrel head. If any type of arrow has any chance of piercing plate armor it’s that one, though perhaps it’d have to be aimed at the thinnest plates. Of course, you could always hope that your arrows landed on the gaps of the armor, and take your chances at penetrating the mail and padding, or perhaps see if your bodkin can slip past the visor. Alternatively, you could choose to not aim directly at the knights or men-at-arms. Terry Jones said it himself. “Never mind the chivalry, kill the horses.”
Horses were a lot more difficult to armor than humans. Mail and padded armor existed, but they weren’t used very often, most likely because of how much they affected the horse’s body temperature as it galloped. Proper full plate armor for horses didn’t really appear until the end of the fifteenth century, and even then it was reserved for the heaviest cavalry. Usually horses would at most wear a chanfron, a simple piece of armor to protect the horse’s head. This piece went as far back as the Roman Empire. Below is a drawing of three German soldiers, from Osprey Publishing.
See how only parts of the horse are covered in steel plates, and the rest is either uncovered or protected by mail. Also, the mounted crossbowman at the back rides on an unarmored horse, as would most cavalrymen. Also note the infantryman wearing only a partial harness, including a style of brigandine reinforced by a placard, the lower portion of a late 15th century breastplate.
Now, there’s one vital element that can make a breastplate virtually impervious to all projectiles. This invisible ingredient is hardness. A skilled 15th century blacksmith could use his forge and a barrel of water to heat-treat a breastplate and turn it from a simple steel plate into a spring, perfect for resisting any blow that may strike it. This process was usually done on the breastplate and the helmet, which were also the thickest parts of the full plate harness. Thinner parts of the armor, like the sides of the visors, would be much easier to penetrate.
About longswords, it all seems very accurate and well researched. I just have two things to say. First, the longest longswords I’ve seen were about 50 inches long, while the shortest were a little over 40 inches. Second, you don’t really need leather gloves to do halfswording as long as you grip the blade firmly. The you will only get cut if you run your hand up or down the edge while putting pressure on it.
The weapon you showed in that picture, which many call Lucerne hammer (after the Swiss city of the same name) but can also be called by a multitude of other names, is a variant of the pollaxe (also called by many other names), a specialized weapon for armored combat. These were generally speaking about as tall as the wielder and had a combination of spikes, axes and hammers on top of a pole, and sometimes a simple spike at the bottom end. Nikolas Lloyd explains it more concisely than I ever could. Below is a reproduction of an English pollaxe by Josh Davis.
Of course, another anti-armor weapon worth considering was the gun. Handheld firearms have been around since the fourteenth century, and while they were extremely inaccurate, at close range or in volleys of fire they could be a threat to armored soldiers. A hardened breastplate could still deflect these shots, but if hit in the thinner parts of his armor a soldier would be in great trouble. Below is a reproduction of a hand gun from the early 15th century, by The Rifle Shoppe.
The rest of your article is fairly spot-on… except the bit about female gladiators, I don’t know where that came from. At least if we’re talking about Rome, we don’t have any evidence of female gladiators wearing any kind of torso protection. In addition, I would add perhaps ten or twenty pounds to your estimation of the weight of a full plate harness. I’d also like to point out that, as awesome as that portrait of Joan is, that armor belongs in the sixteenth century. Armor of her time would be more similar to the seventh image in my reply. Finally, just to be clear, regular cavalry armor would also be suitable for jousting, just not as specialized as actual jousting armor. And of course, the military exercises that eventually developed into the sport of jousting were in practice long before the development of plate armor.
yeah if humans tried to smell space just like that, we’d die, no doubt about it
but the smell of space lingers on spacewalk suits, and docking hatches when astronauts open them!
apparently, space itself smells like burning hot metal, or a hot barbeque grill with a slight hint of spent gasoline. The moon, apparently, smells like a gun after its been shot!
The coolest thing about it all is that the smell is actually what are left of dying stars- it’s literally the smell of stardust, and the particles smell like that because they’re so rich in hydrocarbons- something so very essential to life, and speculated by a lot of astronomers and astrobiologists and such to be the very thing life on earth started from!
another neat fact is that no two solar systems smell the same- ours smells like that because our solar system in particular is extremely rich in carbon, and other solar systems and places in the universe will have extremely different smells depending on what elements are most abundant in their system!