For the beginning of the new academic year and the reopening of the Salle after the Summer break, Ordine della Lame Scaligere in Verona held an open night to showcase the club’s fencing school and all its current disciplines to potential new comers.
With club mates and opponents for the night Nicola and Davide, I had the responsibility to show longsword and medieval sword & buckler to our guests, in a couple of demonstrative judged bouts. Instructors and other members of the club showed sabre, renaissance sword & buckler, side sword, armoured fencing and choreographed fencing for reenactment to the interested crowd.
The open night went very well and we already have some new brave beginners!
What happens when you take the greatest choreographer the world has ever seen and put him with the second greatest choreographer the world has ever seen? And then you give them sticks.
You get this fight scene.
I can narrow down a number of favourite weapon fights when it comes to kung fu cinema and this would definitely be in my top five. Maybe even top three. And best of all? It’s not even an old school fight. It’s a fast, modern fight that just so happens to be with old school poles. Lau Kar Leung was 55 years old in this scene. That’s only 9 years younger than Jackie Chan is now. He never got enough credit for doing bananas shit while being an old man. Unbelievable fight. And the crazy thing is that there’s a good two minutes of empty handed fighting before this bit.
Anyone wondering what film it is, it’s Pedicab Driver. Do yourself a favour and pick up the DVD here. It’s the only remastered version of this film out there and while it has terrible subtitles, if more people buy it, Warner might actually dig in their vaults and release the other classics they have stored away.
@warriormale this seems right up your alley! Train and fight at any age, right?
This is the best tutorial of how to animate bird flight you will ever find.
And I am hella excited to have found it again. I stumbled upon it ages ago, and have thought about is frequently since but hadn’t found it again until now. It’s not just interesting for animation uses, but for anyone looking to draw wings, or who has an interest in how birds fly.
Before this I’d always assumed that birds push the air back behind them on the down stroke to push them forward, but really they push their wings forward on the down stroke to generate more lift by forcing more air over the wings.
It’s a great look at the mechanics of flight and how to approach such unfamiliar movement in animation.
“I would like to share this effort from Sala d’Arme dell’Appeso at retrieving fencing fundamentals (timing, distance, footwork) from two manuscripts belonging to Liechtenauer’s tradition. Thanks to Davide Morleo, Francesco Viola and Federico Dall’Olio for months of trial and discusssion (and costant spam and delirium by my side about olympic korean sabreaurs). Thanks to Maciej Talaga too for his kind and crucial feedback and contribute.(I remade the post since last one didn’t seem to work)“
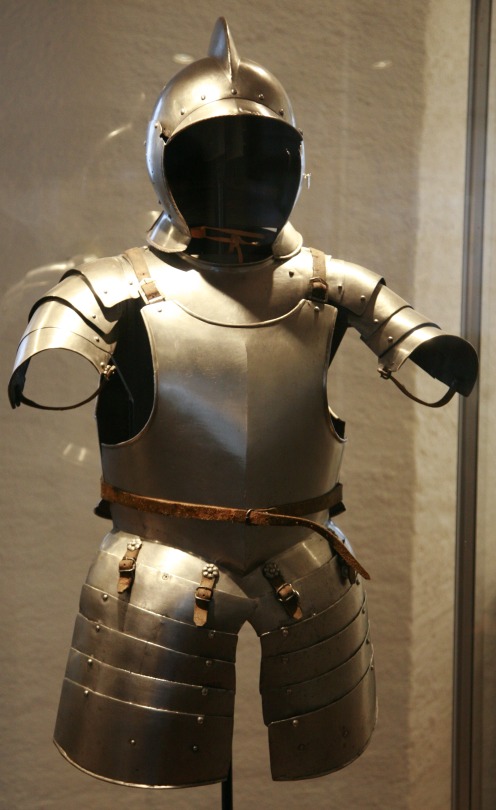
An Almain rivet is a suit of European armor made en masse in the late 15th and 16th century to equip foot soldiers. The word Almain is derived from the Alemanni tribe, the name of which is used in French and old English to call German people. Rivet in this context is derived the use of rivets to link the articulated sliding plates covering the thighs and shoulders of the wearer, and came to be used to refer to the entire suit of armor.
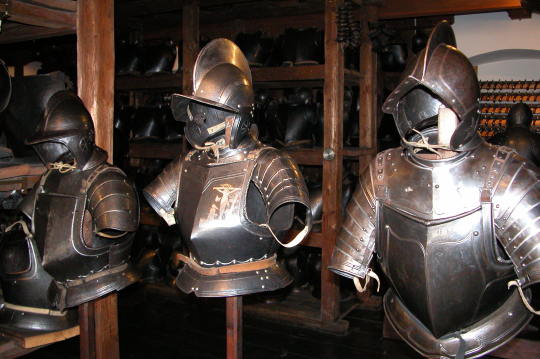
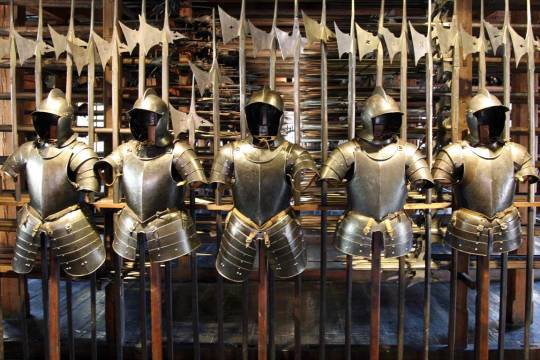
Almain rivets in storage at the Styrian armory in Austria.
These plate harnesses were often made of iron and produced in large numbers at little cost to equip the new armies of the early Renaissance, based on professional standing armies wearing standardized equipment for specific roles. They consisted of a breastplate and back plate, articulated tassets and spaulders and a gorget. It was usually coupled with an open faced helmet like a cabasset, morion or burgonet.
Sword in one hand has four guards(ish), though most people view it as only one. The guards are:
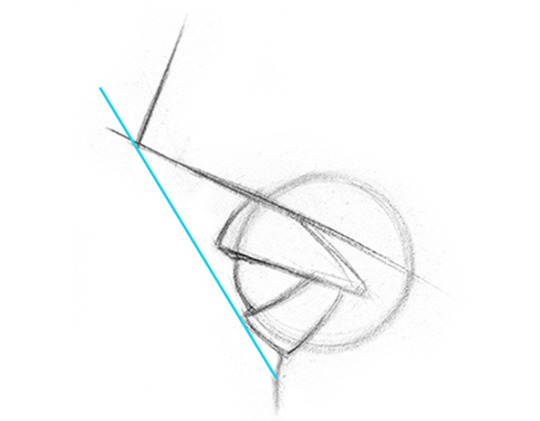
High on the right, depicted here as something like Donna, or it could be something closer to Fenestra as the end point of a roverso sottano (rising backhand cut) or the preparation for an imbroccata (a thrust that descends on the line of mandritto). I would say Donna and Fenestra for simplicity.
A point forward low guard on the right, depicted here with hand withdrawn slightly, for the purpose of throwing a thrust or punta. I would call it Coda Longa Alta, just to stick with later nomenclature for this position.
Coda Longa on the left side, shown here backweighted, also called the deflecting guard. Using later nomenclature, you could also call it a variant of Porta di Ferro Larga, or Guardia Sotto il Bracchio (underarm guard)
From right Donna, cut a dritto fendente down into Coda Longa on a right pass in, cut a roverso sottano up into Fenestra on a left pass in, thrust an overhand thrust that withdraws immediately into Coda Longa Alta, thrust an underhand thrust advancing the right foot and a full step back with a roverso fendente that circles up onto your shoulder in right Donna again.
Donna can beat, cover, break, exchange, and with a cut first to bind on, can turn a villano.
Fenestra can easily cover, break, and exchange, or with the same bind villano.
Coda Longa Alta is can beat, cover, and exchange easily, but doesn’t have the same facility to break. With an attempt to exchange as the way to bind on, you can then villano.
Coda Longa as depicted on the right, can beat, cover, break, and villano easily, but has difficulty exchanging the thrust.
This simple schema of sword on the right and left in 2-4 guard schemas appears in Fiore, Talhoffer, Viggiani & Capoferro & Dall’Agocchie’s simple duel preparation, Pietro Monte, and Marc’Antonio Pagano’s sword in one hand, suggesting that it’s a well known, simple, and effective schema for intense and varied fighting. I’m going to get deeper into Pagano and Monte this next week or two to really play with the concepts. Sword in one hand proved to be an effective and high percentage strategy for closing to Stretto at Boar’s Tooth.
Also worth noting that porta di ferro mezzana is transitioned through in the sword in 1 hand version of the rompere (remember armizare is all about moving from guard to guard) and posta di donna la sinestra & dente di cenghiaro in one hand show up as well, albeit on horseback. Also i would call the withdrawn thrusting position breve rather than coda lunga alta as it fits with fiore’s guard naming conventions better (if this were bolognese i would otherwise agree with you)
Agreed, especially with the point about horseback convention. That’s absolutely Breve. Donna, Breve, and Coda Longa (deflecting guard). Including the sword in one hand on horseback, we would have to add Donna La Sinestra and Dente di Cenghiaro, as you note, and that’s much more rounded.
I’m going to keep playing with this, but making the assumption that Fiore was aware of a distance measure that fits with the circular segno is probably fair (since the Italians claim later that the segno is ancient). From there, it’s a matter of fitting footwork, the Five Elements (beat, cover, break, exchange, villano), and the specific plays that fit from the system as a whole.
A long time ago an anon asked my thoughts about drawing backgrounds, so I finally got around to putting this together. It’s more prop-centric, but it still represents my philosophy to backgrounds.
I’ll try to do something more about drawing actual background spaces in the future! Please let me know what you think, if anything is unclear, or if you have suggestions for other tutorials you might find helpful!
Let’s start by going over some common terminology. The eye socket refers to the hole in the skull where the eyeball sits. The top edge of this hole has a ridge that’s called the brow ridge. The eyeball is covered by a top and bottom lid. At the inner side of the lids, there is a tear duct. The white portion of the eyeball is called the sclera. And the window to our soul is made up of the iris (which is the colored portion), the pupil (thats the black dot) and the cornea, which is a transparent cover shaped like a contact lense.
Simplified
Now, all these little shapes make up the eye, but it’s important to first understand the simplified structure of the eye. These simplified forms should show through all the details. The brow ridge can be simplified into a block. The front plane represents the forehead, and the bottom plane is the roof of the socket. Of course, the eyeball is… a ball.
From the side you can see that the eyeball is deep inside the socket and the brow ridge acts as an awning to protect the sensitive eye from falling things like, rain, dust, asteroids, and bird poop…
Placement
When drawing the eyes, I start by finding their placement on the face. We already know that the face can be broken up into thirds. The brow ridge is represented by the top of the middle third. I like to find the keystone shape of the glabella, which is the space between the eyes, also known as the third eye. From there I’ll continue down the side of the nose to the bottom of the lid and back around to the brow ridge. Make sure to observe how far down the bottom of the lid is.
If the person isn’t looking up or down, but straight ahead, then generally the center of the eyes will be placed in the center of the face. Then, to find the horizontal position, I look for an angle from the wings of the nose to the tear duct. From the front view, this will usually be a straight line up. Of course, first you’d need to find the placement of the nose… which we’ll cover in another lesson. And as a general rule of thumb, this width of the eye is about the same as the distance between the eyes.
A common mistake is to make the eyes too big. But, this doesn’t really look good, does it? This is probably because we think of the eyes as more significant than the rest of the face, and so as a result we make them bigger. But this isn’t always the correct way to make something appear more significant.
Consider adding more contrast, sharper edges and more detailed shapes instead.
Now that we have the general forms, the placement and the size of the eyes established, let’s go a little deeper and explore each part individually.
Sclera
The sclera, or commonly called the white of the eye, is a sphere, and so it needs to be shaded like one. Even though it’s know as the white of the eye, a common mistake is to actually make it white. This will cause it to look flat. The part of the sclera that is visible through the opening in the lids usually has a soft gradation, which is enough to show its roundness.
Eyelids
Wrap around the eyeball, and so again it’s important to remember the simple spherical form underneath and how it affects the outer forms. Construct the shape of the top lid using 3 planes. The side planes and the top plane. For the bottom lid, I use 2 planes. Pay attention to the differences between all these angles and don’t draw fish-shaped or almond shaped eyes. They taste good, but they don’t look good. Typically the peaks of these planes, won’t be symmetrical. Look for a diagonal angle between the peaks.
Another factor that will change the shape of the lids is the cornea. Since it is a convex form, as the cornea moves it will push the lids out. Notice how the shape of the top lid changes as the eye moves.
Also, the lids have some thickness to them, so showing the bottom plane of the top lid and the top plane of the bottom lid is very important. If the light source is above the eye, as it usually is, the top lid will have a shadow underneath and the bottom lid will have a highlight on the top.
Also, from the side, the top lid sticks out further to protect what’s under, just like the brow ridge.
And the last thing about the lids, is the epicanthic fold. Some people will have this skin covering the entire top lid, other have the entire top lid visible, and some only a portion.
Tear Duct
A few important points about the tear duct. It’s usually lower than center. When a person turns far enough towards side view, the eyeball and cornea will cover the connection between the tear duct and lids. And so, you’ll see a little piece of the tear duct peaking from behind.
Iris and Cornea
The shape and angle of the iris is commonly overlooked. It will only be a perfect circle from front view. When the eye turns to the side, the shape becomes an oval. The further the iris is from center, the narrower the oval will become.
If the eyes looks to the side AND up or down, that oval will be angled. To find that angle, imagine a straight line from the center of the eyeball to the iris. The angle of the iris will be perpendicular.
The cornea sits right on top of the iris. It is convex and transparent, like a contact lense. The iris, which is the colored part is also convex (according to anatomical diagrams). BUT I like to draw it as if its concave. This gives the eyes a more life like effect.
This is important to know when you start shading. Imaging the light source coming from the top right. The iris, as a concave form, will be lit at the bottom left. The cornea, as a convex form, will have the opposite light pattern. It will be lit at the top right. Since the cornea is transparent, only the highlight will be visible. So, an easier way to remember all this is… The highlight on the cornea will be on the dark side of the iris.
Pupil
For the pupil, remember that its on the iris, not the cornea. In fact, the pupil is a hole in the iris that lets light in. The pupil dilates to let in more light and contracts to let in less light. So, when drawing the pupil from a side angle, be sure to draw it on the iris, not on the cornea.
Eyebrow
The eyebrows sit on the brow ridge and peak towards the outer end. The outside ends tend to be lighter, thinner, and have less hair than the inside ends. The shape of the eyebrows varies from person to person. Men tend to have fuller and straighter types while women have thinner types that peak higher.
Lashes
The trick with eyelashes is to simplify them. I like to group them together into chunks and draw them as simple dark shapes. From the front, the dark shape of the lashes will merge with the dark shadow under the top lid.
If the lashes are long and curl up enough to be seen as individual lashes, still try to simplify them rather than drawing each lash. I like to draw them blurry as if they are out of focus. From the side, the shape is like a curly triangle.
Ready for more? Go to the next lesson for a step-by-step example of how to draw the eyes.